Fix The Properties for This Item Are Not Available Error in Windows 11/10
There are times when you may want to know the details related to the drives in your system, for example, remaining free disk space, the file system in use, etc., however, you may see “The properties for this item are not available” error message. This issue is common in both Windows 7 and Windows 10. While, in Windows 7 you can get the details related to all drives through My Computer, in Windows 10 you can use This PC to get more information related to all drives.
The My Computer/This PC includes details of all drives, for instance, Hard Drive, SSD or for the CD/DVD drive. To get the details, you must either right-click on My Compute on Windows 7 and select Properties or Open the This PC folder on Windows 10 and right-click on each drive to get the details. Here, you will get all the details related to the specific drive, including it’s security options and more. But, sometimes, as you right-click on the My Computer or on the drives in This PC on Windows 10, the Properties window fails to load and instead returns the error message “The properties for this item are not available” on your Windows 10 PC.
This can be an annoying issue as getting the disk space or file system information is critical for users. However, fortunately, this issue does not arise due to a malware or infection or any other critical system related issues. Apparently, the primary reason for this error due to corrupted or missing registry entries in the system registry. Therefore, in such cases, simply adding the required registry keys in to the system’s registry editor or replacing the corrupted registry keys with the new ones can help fix the issue.
So, let’s see how to fix the “The properties for this item are not available” error on your Windows 10 PC.
*Note – Before you proceed with the below methods, make sure that you check for any pending Windows Updates that you may have missed or Windows 10 failed to install them. In such a case, install the update first and check if it resolves the issue. If not, then proceed with the below methods.
Method 1: Registry Fix Using Notepad
If you are unable to fix the error using the Method 1 or Method 3, you can try making changes to the registry using the Notepad. Follow the below instructions for a possible fix:
*Note – Before you edit the registry settings, make sure you create a back up of the registry data, so that, in case you lose any data in the process, you can recover the same easily.
Step 1: Copy and paste the below text in a Notepad:
Windows Registry Editor Version 5.00

[HKEY_CLASSES_ROOT\Drive\shellex]

[HKEY_CLASSES_ROOT\Drive\shellex\ContextMenuHandlers]

[HKEY_CLASSES_ROOT\Drive\shellex\ContextMenuHandlers\EnhancedStorageShell]
@="{2854F705-3548-414C-A113-93E27C808C85}"

[HKEY_CLASSES_ROOT\Drive\shellex\ContextMenuHandlers\Sharing]
@="{f81e9010-6ea4-11ce-a7ff-00aa003ca9f6}"

[HKEY_CLASSES_ROOT\Drive\shellex\ContextMenuHandlers\{078C597B-DCDD-4D0F-AA16-6EE672D1110B}]

[HKEY_CLASSES_ROOT\Drive\shellex\ContextMenuHandlers\{59099400-57FF-11CE-BD94-0020AF85B590}]
@=""

[HKEY_CLASSES_ROOT\Drive\shellex\ContextMenuHandlers\{596AB062-B4D2-4215-9F74-E9109B0A8153}]

[HKEY_CLASSES_ROOT\Drive\shellex\ContextMenuHandlers\{D6791A63-E7E2-4fee-BF52-5DED8E86E9B8}]
"{D6791A63-E7E2-4fee-BF52-5DED8E86E9B8}"="Portable Devices Menu"

[HKEY_CLASSES_ROOT\Drive\shellex\ContextMenuHandlers\{fbeb8a05-beee-4442-804e-409d6c4515e9}]
@=""

[HKEY_CLASSES_ROOT\Drive\shellex\FolderExtensions]

[HKEY_CLASSES_ROOT\Drive\shellex\FolderExtensions\{fbeb8a05-beee-4442-804e-409d6c4515e9}]
"DriveMask"=dword:00000020

[HKEY_CLASSES_ROOT\Drive\shellex\PropertySheetHandlers]
@="{5F5295E0-429F-1069-A2E2-08002B30309D}"

[HKEY_CLASSES_ROOT\Drive\shellex\PropertySheetHandlers\Sharing]
@="{f81e9010-6ea4-11ce-a7ff-00aa003ca9f6}"

[HKEY_CLASSES_ROOT\Drive\shellex\PropertySheetHandlers\{1f2e5c40-9550-11ce-99d2-00aa006e086c}]

[HKEY_CLASSES_ROOT\Drive\shellex\PropertySheetHandlers\{4a7ded0a-ad25-11d0-98a8-0800361b1103}]

[HKEY_CLASSES_ROOT\Drive\shellex\PropertySheetHandlers\{55B3A0BD-4D28-42fe-8CFB-FA3EDFF969B8}]

[HKEY_CLASSES_ROOT\Drive\shellex\PropertySheetHandlers\{596AB062-B4D2-4215-9F74-E9109B0A8153}]

[HKEY_CLASSES_ROOT\Drive\shellex\PropertySheetHandlers\{5F5295E0-429F-1069-A2E2-08002B30309D}]

[HKEY_CLASSES_ROOT\Drive\shellex\PropertySheetHandlers\{7988B573-EC89-11cf-9C00-00AA00A14F56}]
@=""

[HKEY_CLASSES_ROOT\Drive\shellex\PropertySheetHandlers\{D12267B4-252D-409A-86F9-81BACD3DCBB2}]

[HKEY_CLASSES_ROOT\Drive\shellex\PropertySheetHandlers\{ECCDF543-45CC-11CE-B9BF-0080C87CDBA6}]

[HKEY_CLASSES_ROOT\Drive\shellex\PropertySheetHandlers\{ef43ecfe-2ab9-4632-bf21-58909dd177f0}]
@=""

[HKEY_CLASSES_ROOT\Drive\shellex\PropertySheetHandlers\{fbeb8a05-beee-4442-804e-409d6c4515e9}]
@=""
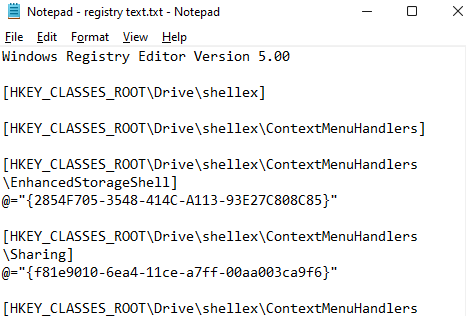
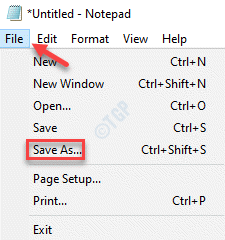
Step 2: Go to File on the top left of the Notepad and select Save As.
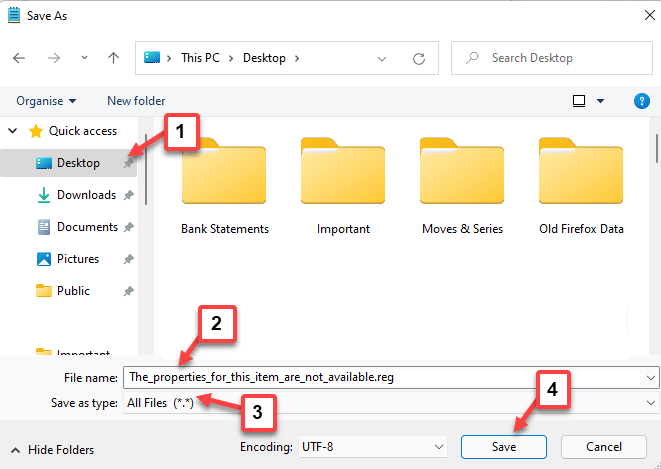
Step 3: Next, In the Save As window, select Desktop (preferably) as the location to save the file.
Now, add The_properties_for_this_item_are_not_available.reg as the File name.
Select All Files as Save as type.
Click Save to save the changes.
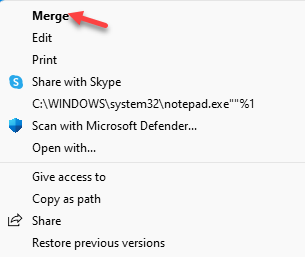
Step 5: Now, close the Notepad and go to Desktop where the .reg file is saved.
Right-click on it and select Merge to merge the file contents with the registry.
This will add the above entries into the Registry Editor.
Step 6: Click Yes in the prompt to proceed.
Restart your PC and the “The properties for this item are not available” error should be resolved.
Method 2: Using the Registry Editor
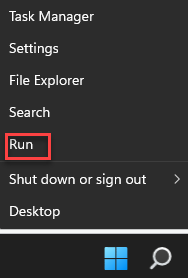
Step 1: Press the Win + X keys together on your keyboard and select Run.
Step 2: This will open the Run command window.
Here, in the search field, type regedit and press OK to open the Registry Editor Windows.
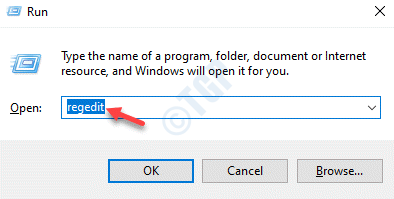
Step 3: Copy and paste the below path in the Registry Editor window and press Enter:
HKEY_LOCAL_MACHINE\SOFTWARE\Classes\AppID
Now, select the AppID folder and press the Ctrl + F shortcut keys to open the Find window.
Here, look for the subclasses key folder that ends with dce86d62b6c7. Type it in the Find dialogue box and click on Find Next and it will start searching for it in the AppID folder.
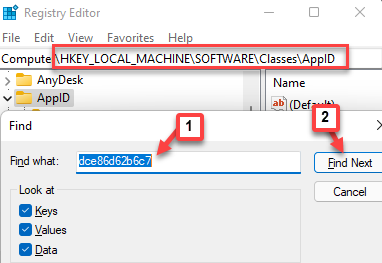
Step 4: It should pull up {448aee3b-dc65-4af6-bf5f-dce86d62b6c7} as the subclasses key folder.
Right-click on this folder and select Permissions.
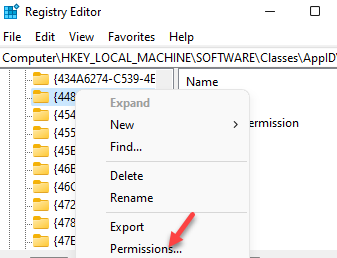
Step 5: In its Permissions window, click on the Advanced button below.
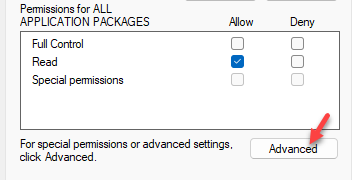
Step 6: In its Advanced Security Settings window, click on Change, next to Owner at the top.

Step 7: In the Select User or Group dialogue box, click on the Advanced button below.

Step 8: Now, in the Select User or Group window, click on the Find Now button.
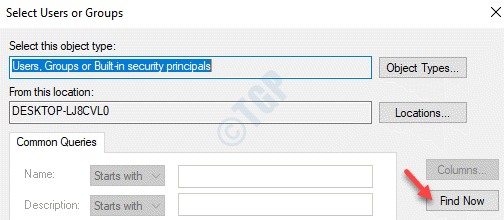
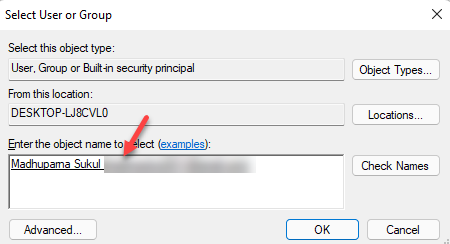
Step 9: From the Search results below, select the owner name and press OK.

Step 10: Back in the Select User or Group dialogue box press OK to return to the Advanced Security Settings window.
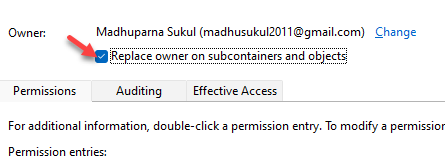
Step 11: Here, under the Owner section at the top, check the box next to replace owner on subcontainers and objects.
Step 11: Now, press the Enable inheritance button below and also check the box next to Replace all child object permissions with inheritable permissions from this object.

Step 12: Press Apply and then in the Windows Security pop up, press Yes to confirm the changes.
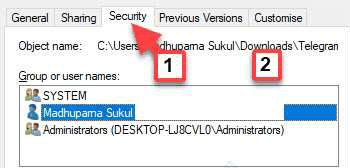
Step 13: Now, back in the Permissions window, in the Group or user names field, select the user name.
Step 14: Next, check the Allow box next to Full Control below.
Press Apply and then OK to save changes and exit.
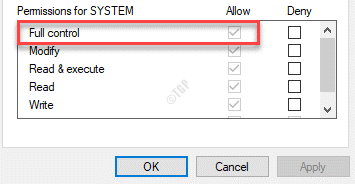
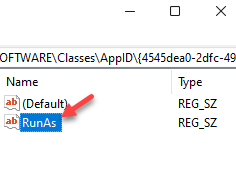
Step 15: Now that you are the owner of the subclasses key folder as shown in Step 4, go to the right side of the window and double-click on the RunAs String Value.
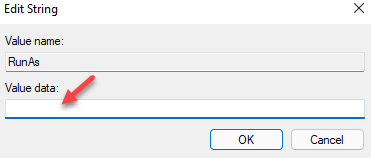
Step 16: In its Edit String dialogue box, go to the Value data field and remove the value (Interactive user).
Press OK to save the changes and exit.
*Note – Make sure you create a back up of the Registry Settings, before you make any changes to the registry. This will help you recover any data lost during the process.
Now, close the Registry Editor, restart your computer and check if the issue persists.
Method 3: Scan and Fix your Removable Media
If the above method does not work, then there is a different issue, may be a bigger issue that’s generating the error. There are chances that the Windows Explorer has crashed and the problem is with more than one drive. It could be either due to incorrect decoding of the data in the drive, the boot information of the drive is not readable, the files in the drive or the file system have gone bad. Here’s how to fix this issue:
*Note – Before you proceed with the method, the first thing you must do is to remove any/all the external or removable storage media. You can then try connecting them back to the system one by one and check which is causing the issue. However, since, you are unable to right-click on the specific drive, you must run a scan and format the disk. Here’s how:
Step 1: Right-click on Start and select Run to open the Run command window.
Step 2: In the Run command search field, type cmd and then press the Ctrl + Shift + Enter keys together on your keyboard to open the elevated Command Prompt.
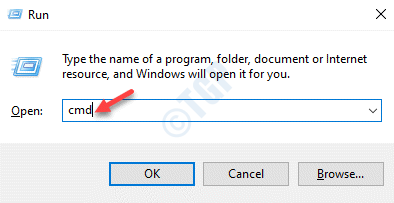
Step 3: In the Command Prompt (admin) window, run the below command and hit Enter:
chkdsk /f E:
This will run a scan on your drive.
 r
r
*Note – Here, E: is the drive letter of your storage device. You can replace this with the drive letter of your storage device.
Step 4: Now, to format the storage device, execute the below command and hit Enter:
format E:
*Note – You can replace the drive letter with the one that represents your storage device.

Now, close the Command Prompt window and right-click on the drive for which you wanted open Properties. It should work now.
Method 4: Disable Corrupted Shell Extension Using ShellExView
This method will help you to find out which programs may be interfering with the system and generating the error. For this, you would need a specific free software. Follow the below steps:
Step 1: Click on the below link to download ShellExView:
Step 2: Click to open the downloaded Zip file.
Now, double-click on the .exe set up file to run the ShellExView software.
Step 3: In the ShellExView window, click on the Options tab above and select Hide All Microsoft Extensions.
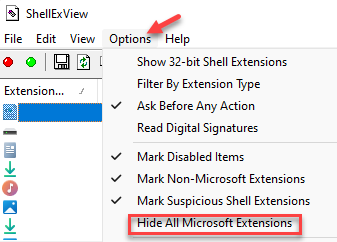
Step 4: Now, press the Ctrl + A shortcut keys to select all the Extensions and hit the red button at the top left of the screen.
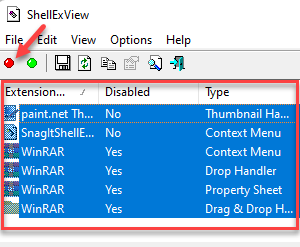
Step 5: In the confirmation pop up, select Yes to confirm the changes.
Now, check if you can access the Properties details for the drive you were having problem with.
Method 5: Restart Windows Explorer
Sometimes, the “The properties for this item are not available” error can arise if the Windows/File Explorer is malfunctioning. In such cases, you can try restarting the Windows Explorer and it may help fix the issue. Let’s see how:
Step 1: Go to Start, right-click on it and select Task Manager.
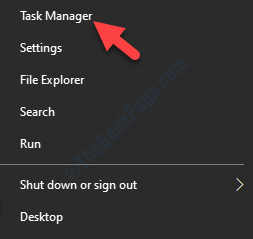
Step 2: In the Task Manager window, under the Processes tab, go to the Windows Processes section.
Look for the Windows Explorer process. Right-click on it and select Restart.
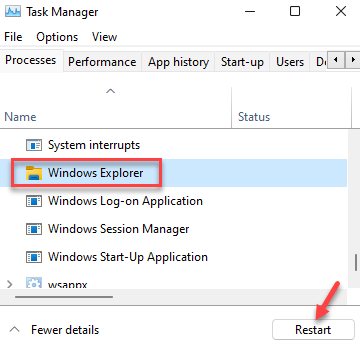
Exit Task Manager and check if the “The properties for this item are not available” error is now gone.
Method 6: Manually check Startup Folder
Step 1: Right-click on Start and select Run.
Step 2: In the Run command window that opens, write %appdata% in the search box and press OK to open the AppData > Roaming folder in the File Explorer.
Step 3: Now, navigate to the Startup folder by following the below path:
Microsoft > Windows > Start Menu > Programs > Startup
Step 4: In the Startup folder, check if there are any junk folders or deal links left behind after uninstallation of a program.
If there are any such files or folders found, delete them all.
Now, restart your PC and right-click on the drive to check if you can now see the Properties option.
Method 7: Use System and Maintenance Troubleshooter
Step 1: Press the Win + R hotkeys to launch the Run command box.
Step 2: In the Run command search field, type Control.exe and hit Enter to open the Control Panel window.
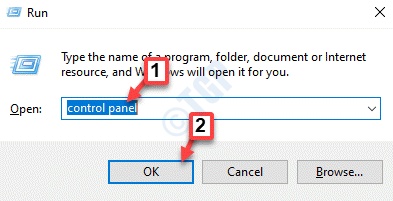
Step 3: In the Control Panel window, go to View by field on the top right and set it to Large icons.
Now, click on Troubleshooting in the list.
![]()
Step 4: Next, on the right side of the pane, click on System and Security.
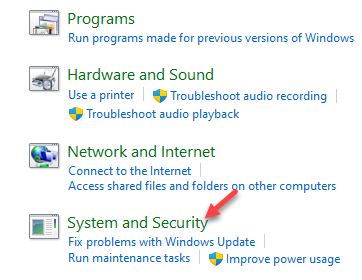
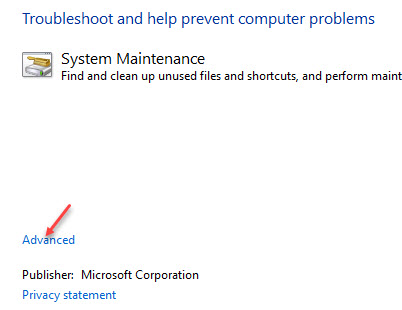
Step 5: In the next screen, click on System Maintenance.
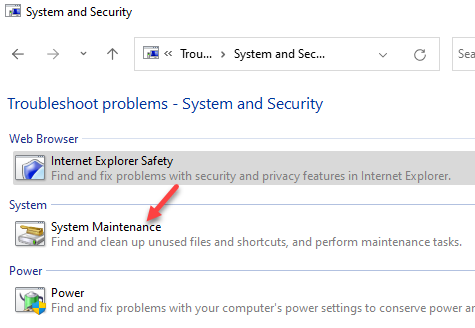
Step 6: In the System Maintenance window, click on Advanced below.
Step 7: Now, check the box next to Apply repairs automatically.
Click on Next.
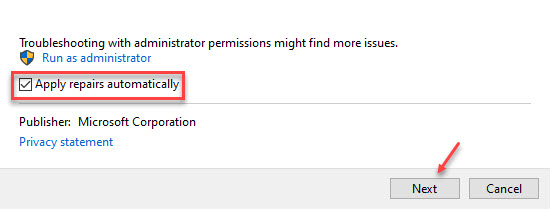
Windows will now start detecting any issues. If any issues found, it will automatically apply the fix.
Reboot your PC and the changes will be effective. You should now be able to use the drive Properties without seeing the error anymore.
Alternatively, you can run the SFC and DISM scan using the Command Prompt (admin) to scan and fix any missing or corrupted system files.
